

How to install Fail2Ban on the Raspberry Pi/Unix server
By opening ports from the Internet to your raspberry pi (ssh, http, ftp, https etc.), you are automatically becoming a victim of many hacker’s attempts. Hackers are seeking exploits and trying to get access to your server. To protect you against such attacks, there is a tool called Fail2Ban. It supports a lot of services (sshd, apache, qmail, proftpd etc.) and can be integrated directly with your IPTables. By this tutorial, we will guide you via the whole process of how to protect against such attacks.
Who is trying to access my raspberry pi?
If you think that your raspberry pi is safe and you do not need any tool to be installed, please check the content of the following file:
cat /var/log/auth.log | grep 'Failed'
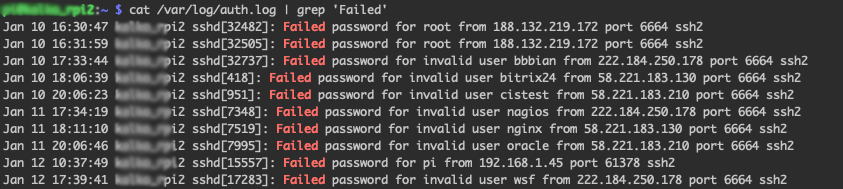
As you can observe above, there are many password failures. Usually, the hacker bots are seeking exploits. Each attempt consumes resources as your raspberry pi needs to evaluate each request. It is known as DoS attack.
Hackers can try also a brute-force attack. Such an attack consists of an attacker submitting many passwords or passphrases with the hope of eventually guessing a combination correctly. The attacker systematically checks all possible passwords and passphrases until the correct one is found.
What is Fail2Ban and how does it work?
Fail2Ban is a daemon that scans access log files and it bans IP addresses that show malicious signs. It protects you against too many password failures as shown above.
It is a must have tool to protect your from intruders to your server or network especially if you allow outside SSH traffic or any traffics from an outside network to your Raspberry Pi. Fail2Ban tool supports many different services (sshd, apache, qmail, proftpd, sasl, asterisk, etc) and can be integrated with your IPTables.
Installation of Fail2Ban is very easy to install and basic setup will drastically improve security on your Raspberry Pi. Fail2Ban works by checking your access logs for failures and depending on the settings you setup, it will ban or timeout an IP Address for a certain amount of time. Fail2Ban tool can easily protect your raspberry pi against very known brute-force and DoS attacks.
How can I protect myself?
Very easy, by installing of Fail2Ban on your raspberry pi. We will first install Fail2Ban by typing the following commands:
sudo apt-get update
sudo apt-get install fail2ban
By doing that, you have Fail2Ban already installed. The configuration file is located at ‘/etc/fail2ban/jail.local’. If you want to change some parameters, you can simply modify this file and restart the service to take immediate effect.
Let’s edit our SSH Fail2Ban configurations. Open up the ‘/etc/fail2ban/jail.local’ file with the following command:
sudo nano /etc/fail2ban/jail.local
Your jail.local file should already contain some pre-defined config. We will need to tweak it a little bit. Find a section in the file called [sshd] and paste/modify accordingly:
[sshd]

enabled = true
filter = sshd
port = ssh
logpath = /var/log/auth.log
bantime = 86400
banaction = iptables-allports
findtime = 900
maxretry = 3
backend = %(sshd_backend)s
After pasting the settings hit CTRL+X and then Y to save the configuration file. Below is what each line in the configuration means and what you can edit:
enabled: Determines whether or not the filter is turned on.
filter: The name of the file located in ‘/etc/fail2ban/filter.d’ that contains the failregex information used to parse log files appropriately.
port: The port Fail2Ban should be referencing in regards to the service. If using the default port, then the service name can be placed here. If you changed your SSH port to something else you would need to write the new port number here.
logpath: The path to your log file.
bantime: The length of time in seconds that the IP Address will be banned for. In my example I used ‘86400’ seconds which would be 24 hours. If you want to ban an IP Address permanently then you will set the bantime to ‘-1’.
banaction: The action to take when banning an IP Address.
findtime: The length of time between login attempts before a ban is set. For example, if Fail2Ban is set to ban an IP after three failed log-in attempts, those three attempts must occur within the set findtime limit. The findtime value should be a set number of seconds.
maxretry: How many attempts can be made to access the server from a single IP before a ban is imposed.
After modification of the configuration file, you need to restart the service to take changes affect:
sudo service fail2ban restart
After the restart of service, your raspberry pi is already protected and all DoS or brute-force attempts will be banned. The list of all banned IPs is cleared upon restarting Fail2Ban or rebooting the server. If you manage to ban yourself, you can simply reboot the server or use the command below:
sudo fail2ban-client set sshd unbanip <IP-YOU-WANT-TO-UNBAN>
You can check your IPTables list with the following command to see all your banned IP addresses:
sudo iptables -L -n --line
source: https://en.wikipedia.org/wiki/Brute-force_attack, https://www.fail2ban.org/wiki/index.php/Main_Page