

Build own OpenVPN server by using Raspberry Pi (Part1/2)
Privacy and defense against cyber attacks is priority one. Use your own raspberry Pi to build up powerful and secure openVPN server. Just connect from anywhere (free public WiFi networks, hotel room etc.) and use advantages of virtual private network (VPN) for free. By using your own openVPN server, Internet browsing stays encrypted and secure.
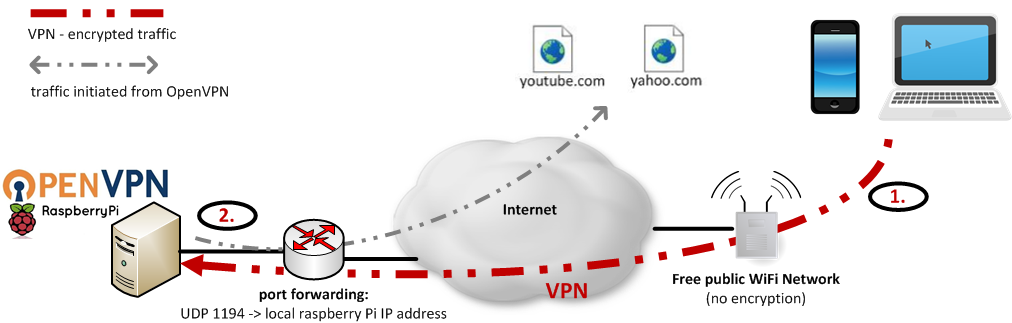
See network diagram above describing our scenario
1. Traffic is encrypted on the way to OpenVPN server
2. Traffic is initiated from OpenVPN server on behalf of client (mobile, laptop)
Introduction
Almost everybody wants to stay connected and “to be online”. For that purpose there are almost everywhere WiFi networks which can be used for free but usually they have one big disadvantage – NO ENCRYPTION. It means data which are transmitted/received are visible for everybody. It is great opportunity for hackers to intercept traffic and use it in their profits. By following simple steps you can set-up your own OpenVPN (located at home or workplace) which can be used as encryption endpoint. This will make your computer think it’s actually on your home network, even when you may be miles away. All network traffic is encrypted and sent to and from the VPN server, stopping would-be hackers in their tracks. We tried to prepare our tutorial as simple as possible with many details. In our scenario we used well-known raspberry Pi, credit card-sized single-board computer.
Tutorial is divided into two parts:
Build own OpenVPN server by using Raspberry Pi (Part1/2) – server configuration (Raspberry Pi)
Build own OpenVPN server by using Raspberry Pi (Part2/2) – client configuration (mobile/laptop)
Usage scenarios
A) To encrypt your traffic during Internet browsing, connected to free/open WiFi networks (airport, hotel etc.) – nobody is able to sniff data
B) To connect to your home network so you can access your web-camera, IPTV, router etc.
C) To access pages which are usually blocked by local network you are connected to (bypass proxy, firewall rules etc.)
Prerequisites
- raspberry Pi with pre-installed image (e.g. Raspbian image)
- raspberry Pi accessible from the Internet (via dynamic DNS or public IP)
- client (laptop/pc or smartphone) connected to the Internet
- UDP port 1194 forwarded to your local raspberry Pi (configuration depends on type of your router, try to google it: “your router model” port forwarding)
Allow the OpenVPN server to route ip traffic
First of all, you need to allow the OpenVPN server to route packets:
sudo vim /etc/sysctl.conf
Uncomment following line to ensure that packets will be forwarded:
net.ipv4.ip_forward=1
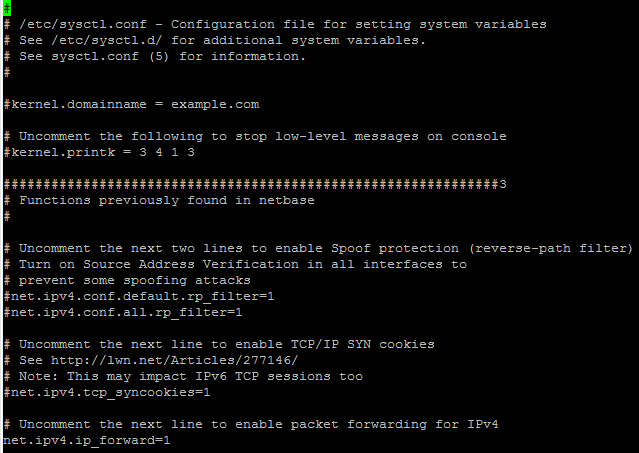
Your modified file should look like this
Activate change and make it persistent:
sudo sysctl -p
Permanent/static local IP
In that case you have two options, please follow option A) or option B). It is not required to follow both.
A) Configure Raspberry Pi to use static IP instead of dynamic IP
sudo vim /etc/network/interfaces
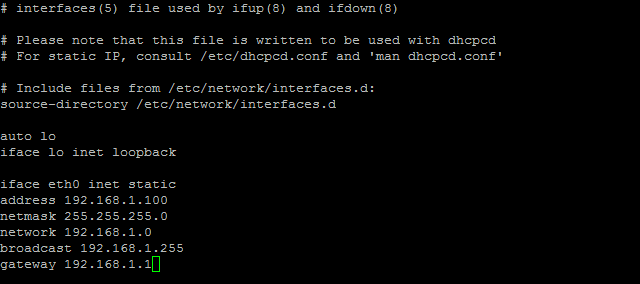
Replace above mentioned IP addresses with yours
B) Set-up DHCP/IP address reservation on your router
It depends on model of your router, try to google it: “your router model” DHCP/IP reservation
Installing openVPN
sudo apt-get update && sudo apt-get upgrade
sudo apt-get install openvpn -y
It will take some time, please be patient. First you will update your repositories and make upgrade of all currently installed packages. By second command you will install openVPN package.
Creating local CA and generating server certificate
For generating certificates we will use easy-rsa. It is a CLI utility to build and manage a PKI CA. It is able to create a root certificate authority, and request and sign certificates, including sub-CAs and certificate revocation lists (CRL).In older versions there was needed to installs easy-rsa separately but currently easy-rsa package is already included in openVPN dependencies (version used in tutorial: OpenVPN 2.3.4).
Switch to root user:
sudo -s
Copy easy-rsa folder to openvpn folder:
cp -r /usr/share/easy-rsa /etc/openvpn/easy-rsa
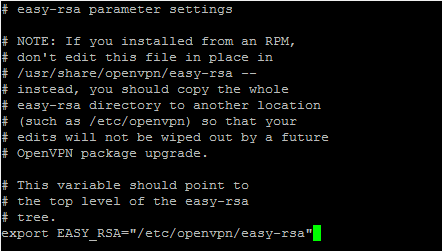
Open copy of easy-rsa and modify variable EASY_RSA:
cd /etc/openvpn/easy-rsa
vi vars
In the file, modify:
export EASY_RSA="`pwd`"
to:
export EASY_RSA="/etc/openvpn/easy-rsa"
Modification vars file – adding absolute path
In the same file, just scrolling down, double check what KEY SIZE is currently defined. In the newest version there is value of 2048 by default. In case there is value lower than 2048, increase it to 2048. It will definitely increase security.
export KEY_SIZE=2048
Now, build your encryption certificates, type exact commands as mentioned below.
After editing vars file, you have to source it (to apply changes):
source ./vars
To start with a fresh PKI configuration and to delete any previous certificates and keys
./clean-all
After issuing this command there will be some fields you have to type in (or just press ENTER to use default values)
./build-ca
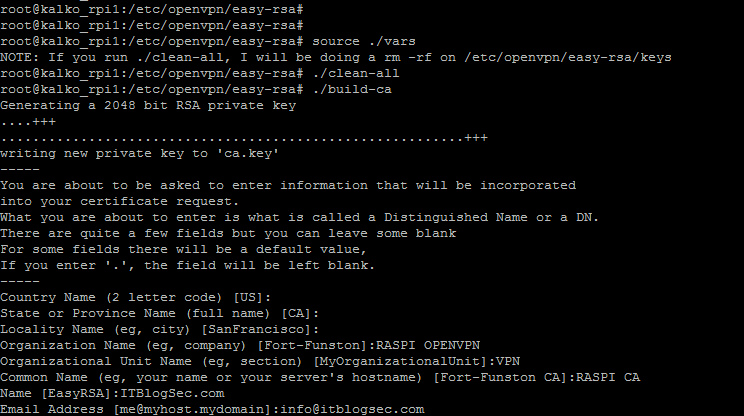
Creating local CA – later on used to sign certificates
Once all steps above were successfully accomplished, you can now generate certificate for your server (in our case ITBlogSec.com will be name of our server):
./build-key-server ITBlogSec.com
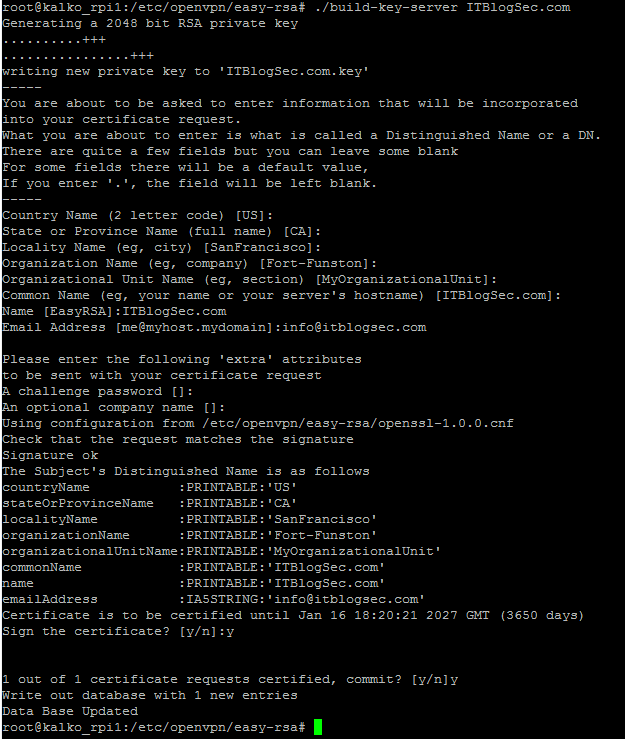
Creation of certificate for your OpenVPN server
By this step you successfully created certificate for your openVPN server named ITBlogSec.com. The most important part of this step is attribute “commonName”, here name has to exactly match with name you entered in previous step.
Creating client certificates
In that part we will create certificates for all our clients. Beware that you can generate only one client certificate and import to many clients but in this case only one client would be able to connect at a time. Therefore is recommended to create certificate for each client.
Enter command below to generate certificate for Client1:
./build-key-pass Client1
Fill in all fields as described below, of course you can use your information. For “PEM pass phrase” use your own password. This password must be entered every time Client1 is connecting to server. For “A challenge password” must be left blank.

Generating certificate for Client1
Now we’re going to change the keys to different encryption scheme. I would recommend to use AES-256-CBC.
Issue command to find out what ciphers are supported by your version of openvpn:
openvpn --show-ciphers
In case AES-256-CBC is one of supported, issue commands below. Once asked to enter pass phrase and PEM phrase, use same PEM phrase password as above:
cd keys
openssl rsa -in Client1.key -aes256 -out Client1.aes256.key

Change the keys to an encryption scheme called aes256
It is time to generate Diffie-Hellman keys for your server. It will allow to exchange keys via public internet. If you want to understand in details, please check YouTube video here. Issuing command will take some time, apx. 15 min, so please be patient.
cd ..
./build-dh
Configuring OpenVPN server
By this part you will make basic configuration of your openVPN server based on our requirements.
Create server.conf file which will contain all important attributes:
touch /etc/openvpn/server.conf
Open newly created file and paste there config. Follow comments in the code and adjust according to your network:
local 192.168.1.100 # SWAP THIS NUMBER WITH YOUR RASPBERRY PI IP ADDRESS
dev tun
proto udp  #Some people prefer to use tcp. Don't change it if you don't know.
port 1194
ca /etc/openvpn/easy-rsa/keys/ca.crt
cert /etc/openvpn/easy-rsa/keys/ITBlogSec.com.crt # SWAP WITH YOUR CRT NAME
key /etc/openvpn/easy-rsa/keys/ITBlogSec.com.key # SWAP WITH YOUR KEY NAME
dh /etc/openvpn/easy-rsa/keys/dh2048.pem
server 10.8.0.0 255.255.255.0
# server and remote endpoints
ifconfig 10.8.0.1 10.8.0.2
# Add route to Client routing table for the OpenVPN Server
push "route 10.8.0.1 255.255.255.255"
# Add route to Client routing table for the OpenVPN Subnet
push "route 10.8.0.0 255.255.255.0"
# your local subnet
push "route 192.168.1.0 255.255.255.255" # SWAP THE IP NUMBER WITH YOUR RASPBERRY PI IP ADDRESS
# Set primary domain name server address to the SOHO Router
# If your router does not do DNS, you can use Google DNS 8.8.8.8
push "dhcp-option DNS 192.168.1.1" # This should match your router's IP address.
# Override the Client default gateway by using 0.0.0.0/1 and
# 128.0.0.0/1 rather than 0.0.0.0/0. This has the benefit of
# overriding but not wiping out the original default gateway.
push "redirect-gateway def1"
client-to-client
duplicate-cn
keepalive 10 120
tls-auth /etc/openvpn/easy-rsa/keys/ta.key 0
cipher AES-256-CBC
comp-lzo
user nobody
group nogroup
persist-key
persist-tun
status /var/log/openvpn-status.log 20
log /var/log/openvpn.log
verb 1
Finally, we’re going to implement OpenVPN’s build-in Denial of Service (DoS) attack protection. You might already know that a DoS attack is successful when a hacker finds out your server’s address, and generates such a large number of access requests that your server crashes.
OpenVPN has a way to prevent this kind of attack from occurring before it even starts by generating a static pre-shared hash-based message authentication code (HMAC) key. With this in place, the server won’t even entertain the idea of authenticating an access request unless it detects this static key first. Thus, a hacker can’t just spam the server with random repeated requests.
Generate the static HMAC key with the following line:
openvpn --genkey --secret keys/ta.key
The IPtables
This article is about building proper iptable rules and how to make iptable configurations to load on every reboot.
I have been trying to find a consistent and easy solution to implement iptables on Raspberry Pi (Raspbian-wheezy), the way Debian and Raspbian works does not provide a way to load iptables on every boot, it needs to be added manually as a script to load on start-up. There are ways to make Raspbian work without the instructions below, although the following – I think – are very simple and elegant.
Install package called “iptables-persistent”:
apt-get update
apt-get install iptables-persistent
On the menu, select Yes on the rule.v4 file. The second choice is about rule.v6 and IPv6 support, choose based on your needs.
By rule below you will ensure that all traffic initiated from clients will be masqueraded as traffic outgoing from eth0. Now you can manually add rule by following command:
iptables -t nat -A POSTROUTING -s 10.8.0.0/24 -o eth0 -j MASQUERADE
Save current rules to be loaded automatically after next reboot:
iptables-save > /etc/iptables/rules.v4
Please reboot raspberry and check that rules are still present:
less /etc/iptables/rules.v4
Output should be similar as below:
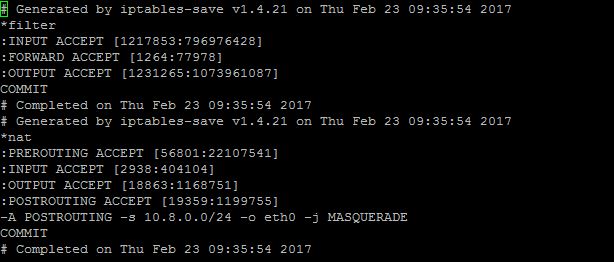
Output of file /etc/iptables/rules.v4
Conclusion
If you successfully followed all steps above, congratulations! Your openVPN server is ready. Please follow our next article (Part2/2) where will be mentioned exact steps how to import certificates to the client and how to establish VPN tunnel successfully.
Thank you!
SEE ALSO: Build own OpenVPN server by using Raspberry Pi (Part2/2) – client configuration (mobile/laptop)
1 comment
[…] you can use any virtualization platform you want, even there is ARM Kali Linux image available for rapsbperry PI, you can download it […]