

How to make SOCKS proxy server by using Raspberry Pi
Sometimes you’re on a network that’s insecure or has an overly restrictive firewall, and you need to access a website. You want to make sure no one in the middle is watching the traffic.
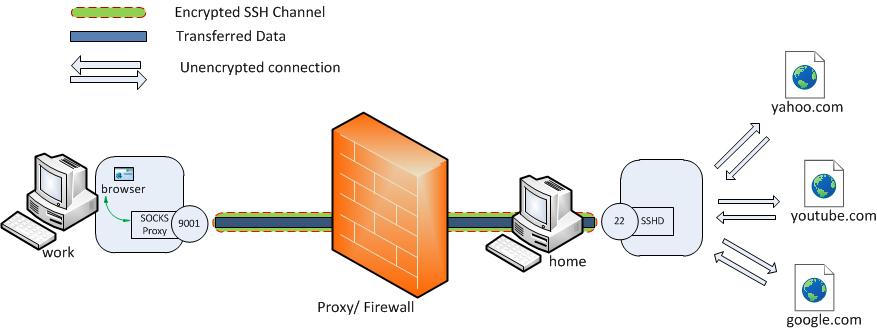
Network scenario to use home based server (raspberry Pi) for secure browsing
INTRODUCTION
The easiest way to be sure that nobody is sniffing your communication is using your home-located raspberry PI with public IP or dynamic DNS (reachable from the Internet). As such communication is forwarded via encrypted SSH tunnel, nobody is able to decrypt it and see your sensitive data. Such deployment does not require any additional client software installation so you can use it also on computer with limited privileges.
A SOCKS proxy is basically SSH tunnel. All requests are forwarded to the SSH tunnel which is transporting data to the destination server and then on the server end, the proxy forwards the traffic out to the general Internet.
In our scenario we will use raspberry PI which is running in your home network but publicly accessible from the Internet (via dynamic DNS or public IP). In the same way you can use any linux-based OS (Ubuntu). One big advantage of using Raspberry Pi is it’s power consumption (~ 4-5 W/h) so it can be running continuously without interruption and you can connect and use it anytime.
USAGE SCENARIOS
A) To encrypt your traffic during browsing on free/open Wifi hotspots (airport, hotel etc.) – nobody is able to sniff your sensitive data
B) To connect to your home network so you can access your web-camera, IPTV, router etc.
C) To access pages which are usually blocked by local network you are connected to (bypass proxy, firewall rules etc.)
PREREQUISITES
- raspberry PI with installed image (e.g. Raspbian image)
- raspberry PI accessible from the Internet (via dynamic DNS or public IP).
- laptop/pc or mobile connected to the Internet (running WINDOWS OS, MAC OS X or LINUX)
STEPS (WINDOWS OS)
1. Download portable putty application here
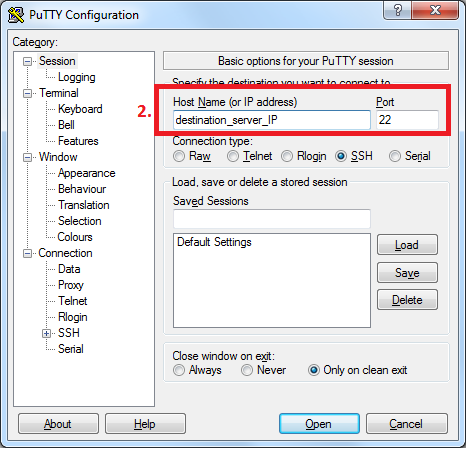
Open putty and navigate to session tab
2. Add the Host Name (or IP address) of your server, and the SSH Port (typically 22)
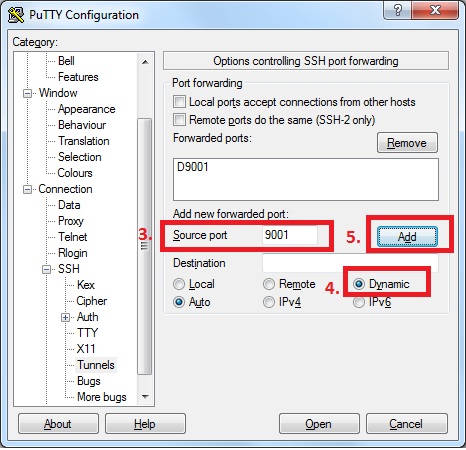
Navigate to Connection -> SSH -> Tunnels
3. Type source port which will be listening on source machine (in our case 9001)
4. Select “Dynamic” radio button
5. Click button “Add”
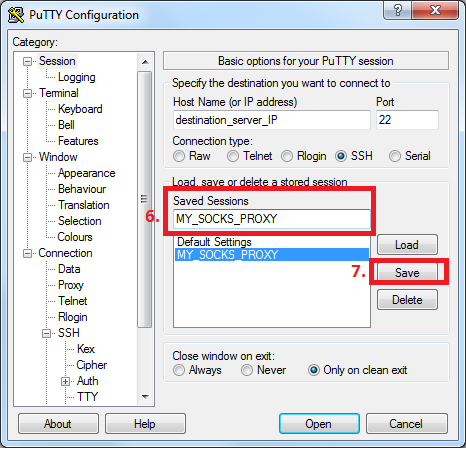
Navigate back to the session tab
6. Name your session for further loading (so you do not have to repeat all steps again)
7. Click button “Save” and then click button “Open” and enter your credentials in order login
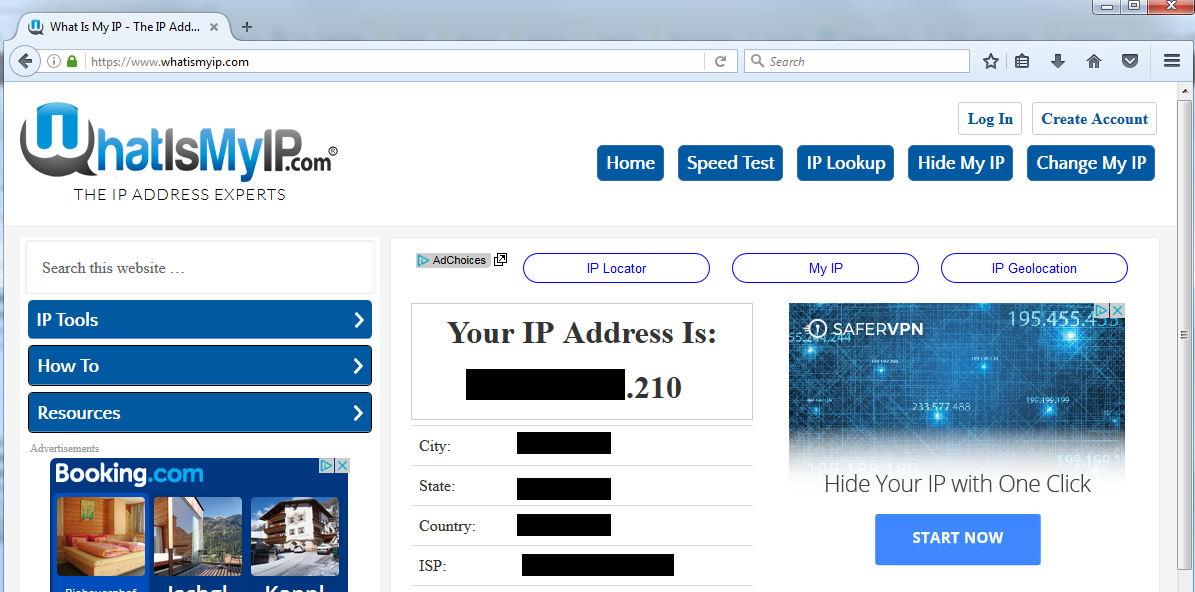
Check you current public IP by using https://www.whatismyip.com/
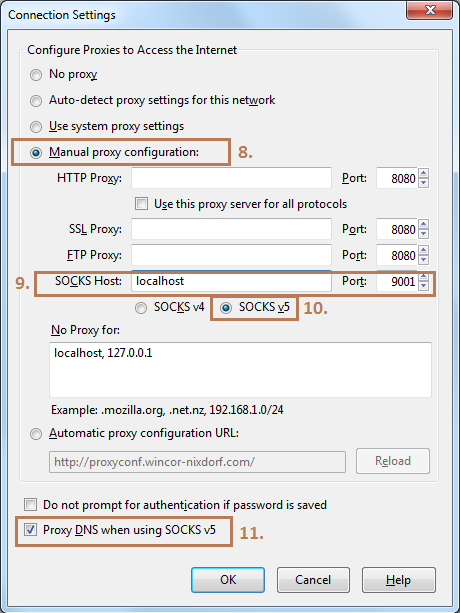
Mozilla browser -> Options -> Advanced -> Network -> Settings
8. Select radio button “Manual proxy configuration”
9. Input localhost and local port 9001
10. Check Proxy DNS in case you want to forward also DNS requests via proxy tunnel (recommended)
Now, open another tab in Firefox and start browsing the web! You should be all set for secure browsing through your SSH tunnel. By checking your public IP, you should be able to see that for now you are using different IP. All connections (including DNS) should be encrypted and invisible for possible attackers.
STEPS (Mac OS X/Linux)
- on local machine run following command to open SSH tunnelssh -D 9001 -f -C -q -N user@your_domain_name_or_IP.com
Arguments:
-D: creating dynamic SSH tunnel
-f: running command in background
-C: compress data before sending
-q: quite mode
-N: no commands will be sent once tunnel is UP - check that your tunnel is running
ps aux | grep 9001
Output:

- check that your machine is listening on localhost and ready to forward traffic via tunnel
sudo netstat -antp
Output:

- Now repeat the same steps to configure Mozilla Firefox (described above)
- If you want to disable SSH tunnel, you need to kill process (in our case it is PID 15803)
kill 15803
CONCLUSION
Nowadays almost everybody is talking about IT security, hackers and possible attacks. Pay some minutes to follow simple steps to encrypt your traffic using SOCKS proxy when you are on way. Do not get any chance to provide your sensitive data to third-party person who can use it illegally.